
Ikea Butcher Block Countertops

Ikea butcherblock countertops are not only beautiful, but super affordable. We used butcherblock to repurpose our existing builders-grade island and extend seating. This made the island more usable and comfortable for our guests to enjoy! Our entire kitchen transformation on a budget was a labor of love and increased the value of our home.
Our kitchen island, before installing Ikea butcherblock:

Kitchen island, before 


Embarrassing pictures ahead. I admit to being in a DIY learning curve – but if nothing else, it will make you understand that we all have to start somewhere when it comes to enhancing our DIY skills!


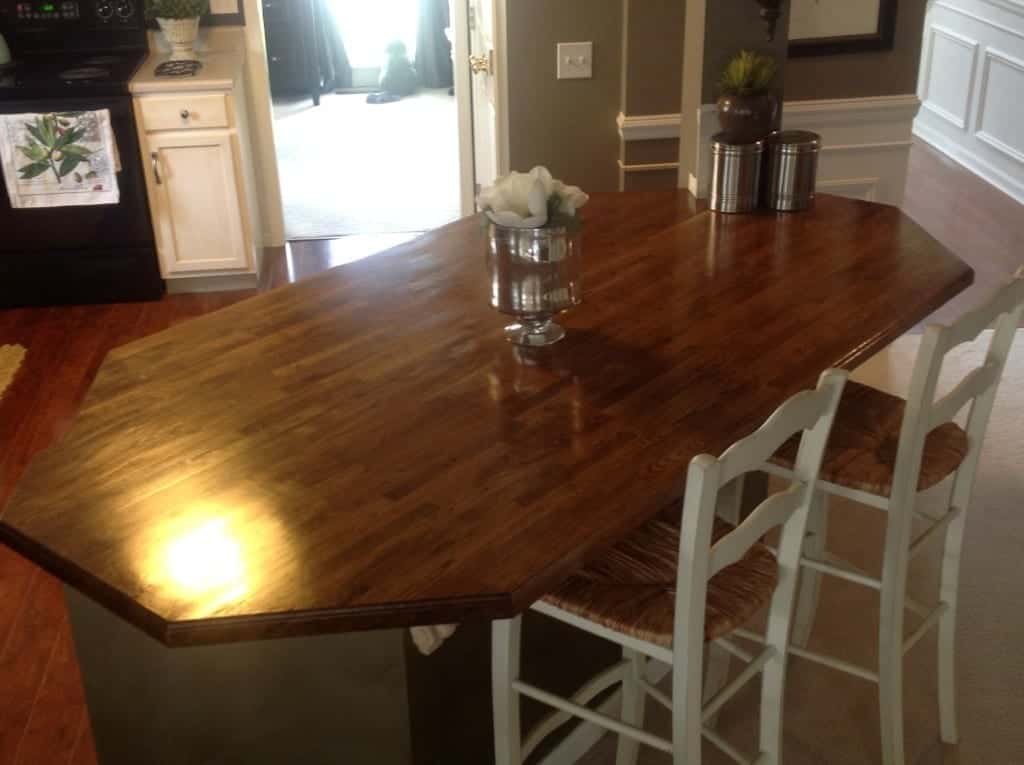
DIY Ikea Butcher Block Countertops
At the time we leveled the island, this is what we started with. 
Our goal was to make the island level and extend it so we had more leg room.

Very shallow overhang…only 7″ of legroom!!
Demolition Process:
As far as the demolition, I of course have no photos of that process. But to explain what we did…first we shut off the power completely to the island. Then used mallets to pound (upwards) on the island countertop to remove it. Then just hammered away the drywall. The studs were cut down using a tool called Sawz-All until it was completely level. We then had to patch and repair the drywall that was attached to the island.
We made a template out of cardboard, and tested the legroom with our tiny chair…15″ overhang. Much better!

And…after the demolition, our view into the family room definitely improved…

Our trip to Pittsburgh Ikea (130 miles one way) produced two very nice walnut countertops. A single countertop unfortunately was not wide enough to cover our island, so we had to buy two to splice together. (Island width was 45″x80″ for more legroom and a 15″ overhang).

Biscuit cutter, essential tool for adjoining the two countertops.

Ready for wood glue, and…biscuits!

Clamp it, wait 24 hours.
Once it was glued, we placed the template back on top and traced the shape, then cut using a jigsaw. View from the loft…
Added corbels from Architectural Depot:
Materials Purchased:
Two 96” x 25” Ikea butcher block countertops.
From Lowe’s we purchased Rustoleum Cabinet Transformations paint kit, electrical supplies for adding outlets.
Cardboard from JoAnn Fabrics (large enough to make a template).
Best Tutorial: How to Install a Butcher Block-Countertop (from This Old House)


")
Everything is turning out beautifully! LOVE your corbels. I am trying to find some for our counter that sticks out. It does not stick out as far as your though.
Thank you for visiting my blog, I’m anxious to see your final reveal but your kitchen progress is A-mazing. I will keep your blog closeby if I ever decide to tackle mine with chalk paint. The corbels are from Architectural Depot online and come in all shapes and sizes.
Your kitchen is beautiful! We have a 16 y/o house with a useless high counter above our sink that separates our kitchen from the eat-in area and family room. We are planning to get butcher block countertops from floor & decor and create something similar to yours. We will have to join a couple of the counters also. My question is, how difficult was it to cut off the upper counter and did you re-wire the outlets? I will have to move at least some of the electricity because the switch to my garbage disposal is right where those outlet are. I can’t seem to find many people out in blog land that have done this. Thanks for any help and advice you can offer.
Monica
Monica,
The upper counter was fairly simple to remove once I purchased a reciprocating saw. That makes the cutting very simple. Even without one though the removal is not too tricky. I did rewire the outlets and mounted them behind false drawer fronts on the ends of the island. I would be happy to help you navigate through as you go.
Mark