DIY Industrial Light Fixture
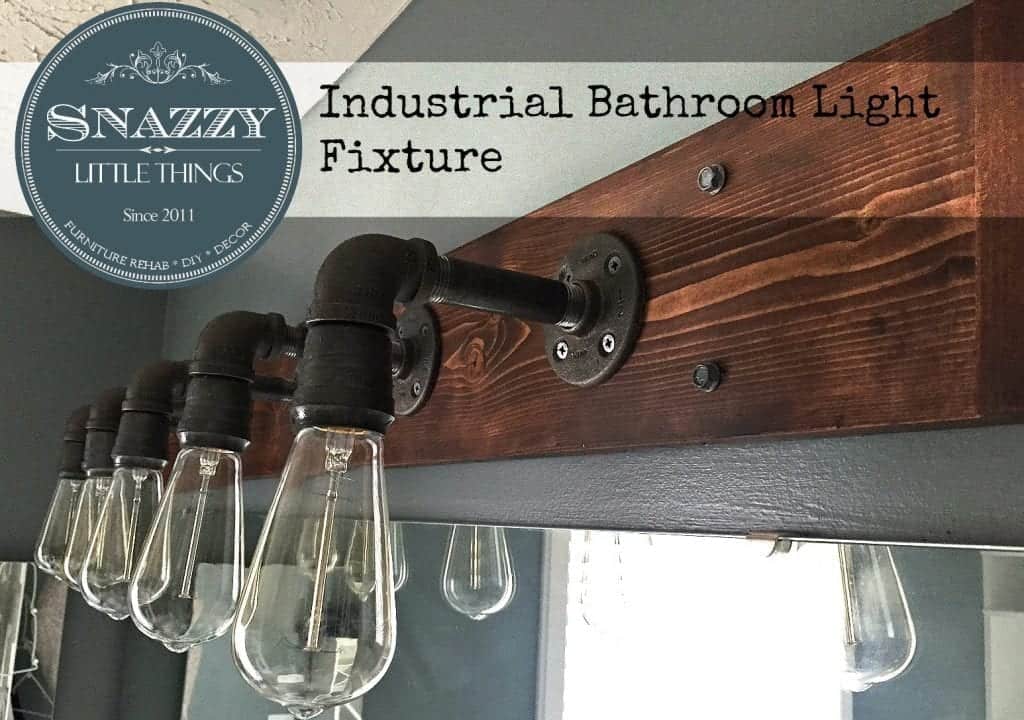
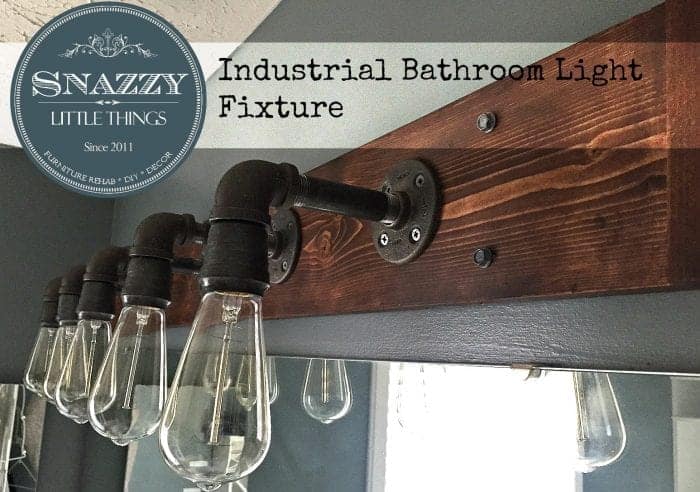
Jeanette and I are in the middle of a bathroom remodel, so when our bathroom remodel came about, we found a few items on Pinterest that would complement our industrial theme. We made some minor tweaks to the original, changed it from black to dark walnut stain to get the look we were going for but in the end it came out quite well we think.
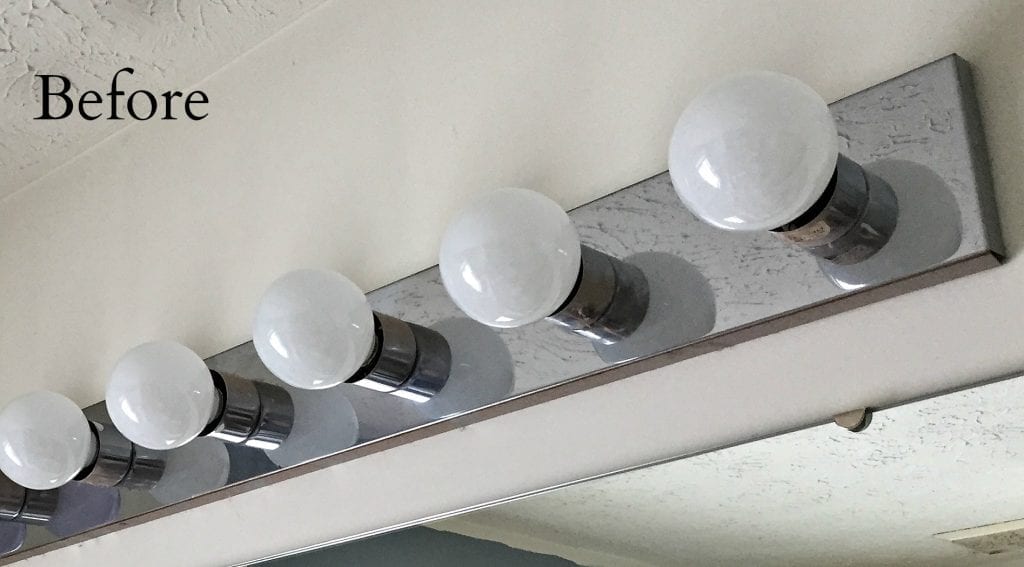
But this old thing….it had to go.
With THAT old light donated and gone, it was onward and upward.
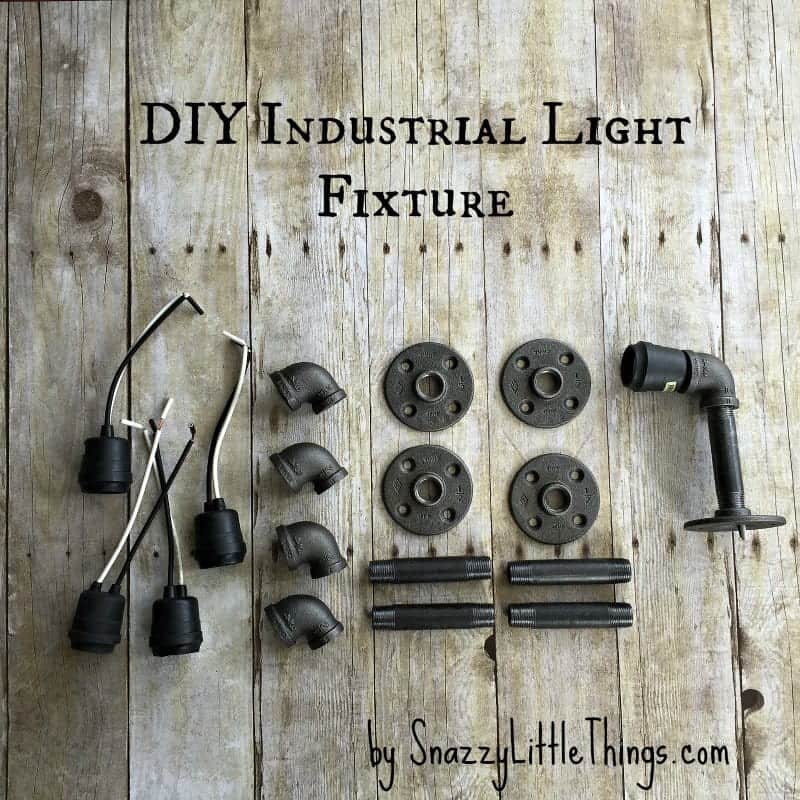
Let’s start with a material list:
- One 4ft long 1X6 Pine – You choose whether you want slightly knotty or clear pine
- Two 5 1/2 Inch long 2Ft 2X2 Pine – you can either by a 2X2 spindle or just rip a 2X4 on your table saw down to 1 1/2 inches wide
- Five 1/2″ black galvanized flanges
- Five 1/2″ black galvanized nipples – 4″ long
- Five black galvanized reducing ells – 3/4″ – 1/2″
- Five outdoor light sockets
- Twenty 1/2″ Flat Head Screws – these are silver and you will spray paint them later
- Four Hex Screws 4″ long – also silver, will paint later
- 10 ft each of black and white #14 wire and 20 wire nuts that will fit up to 3 #14 wires
- Rustoleum Grey Hammered Spray Paint
- Varathane Dark Walnut Stain
Step One:
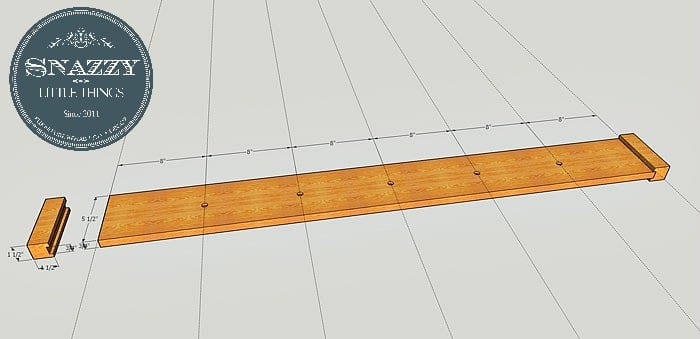
Mark your 1X6 at 8 inch increments, then cross those lines with a mark 2 3/4″ from the edge of the board. Next drill a 1/2″ diameter hole at each of these intersections.
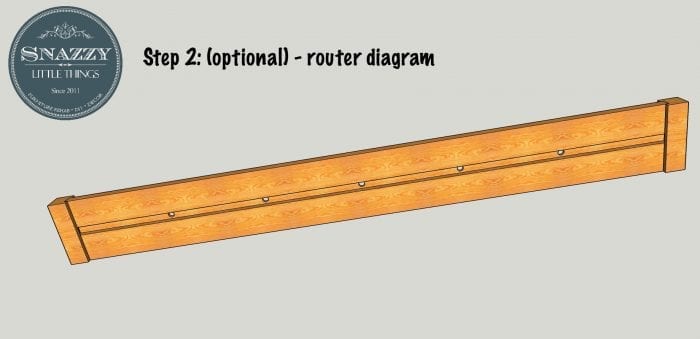
Step Two: Optional (if you do not have access to a router)
Next we will make a channel to conceal the wiring. Use a 3/4″ router bit to cut a 1/2″ deep channel lengthwise down the center of the board.
Then use the same router bit to cut an 1/2″ channel on each of the short 1 1/2″ X 1 1/2″ pieces.
Step Three:
Screw or nail the end caps to the 4ft board leaving 1/4″ overhang in front and back.
Step Four:
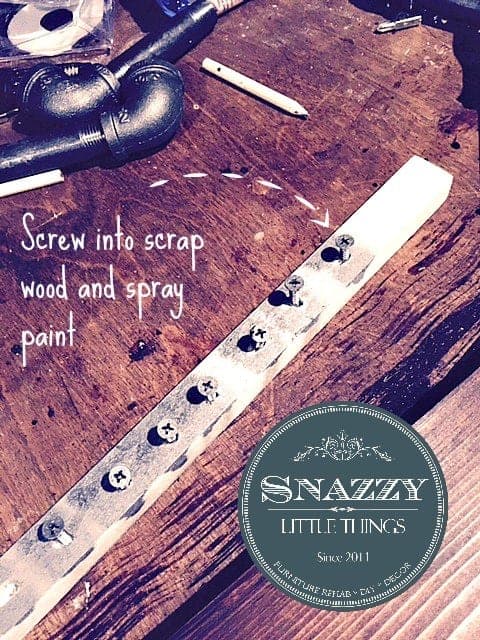
Screw the 20 screws and the 4 bolts int a scrap piece of wood just enough to make them stand up. Spray each with the Rustoleum Hammered Grey to match the color of the galvanized pipe. Stain the boards with the Varathane Dark Walnut.
Step 5:
Center the flanges over the holes you drilled and mount with your painted 1/2″ screws
Step 6:
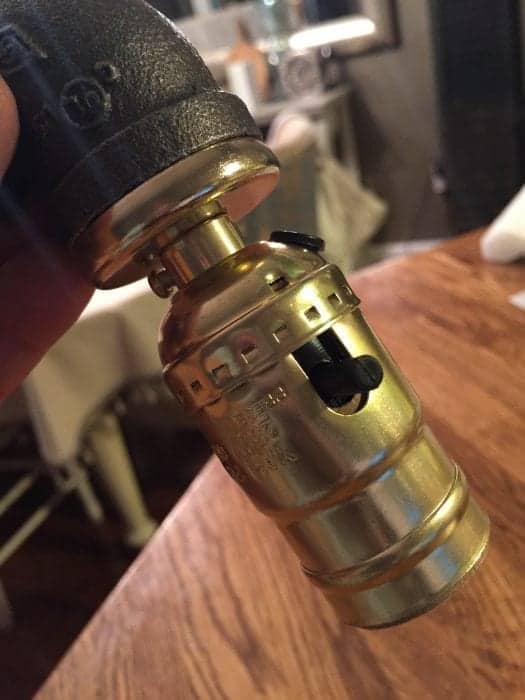
Now comes the time to attach the light socket to the galvanized pipe. At the time of this build I was unaware of any fittings that would match up with the threads on a 3/4″ galvanized pipe so I took a different approach. Since then I have discovered that Home Depot sells a lamp kit that makes this process very simple. What follows are instruction on how I did it and how one can use the lamp kit.
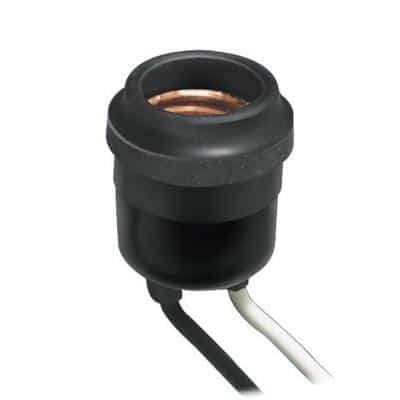
So here goes. I chose an indoor/outdoor light socket from Home Depot
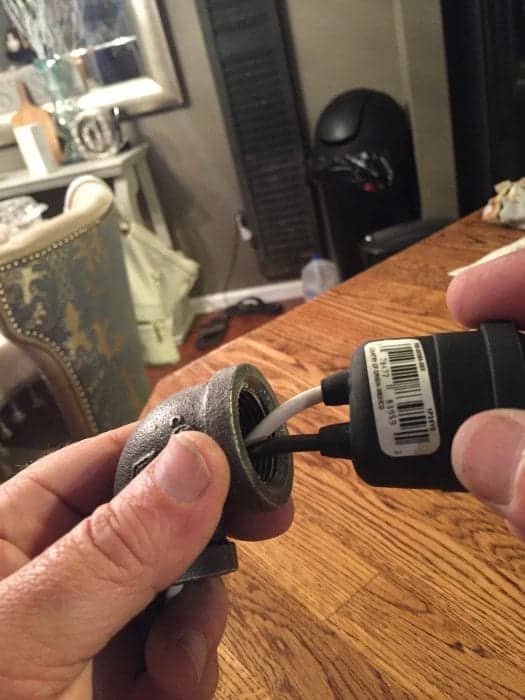
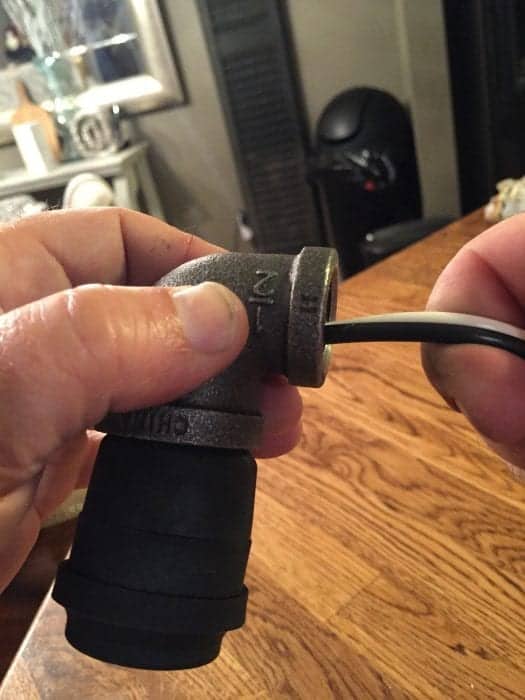
This presents a challenge in that the fixture does not thread into the pipe in any way. So the only way to get it to stay in place is to use the tension created by the wires being pulled tight to hold it in place. If you pull it up snugly enough the socket will seat in the pipe and will stay in place just fine. Alternatively you can use epoxy or some other adhesive to attach the socket to the pipe once you have pulled the wires through. I just used tension.
Once you have pulled the wire through and connected it to the rest of the wiring, as long as you keep the tension solid, the socket will stay in place.
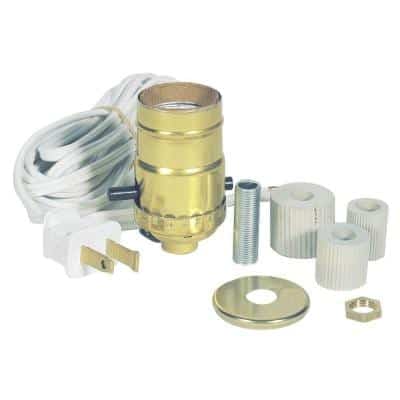
Option two would be to use the Lamp Kit
This is a kit available at Home Depot that allows you to make a lamp out of just about anything. they do add significantly to the cost of the project as they are considerably more expensive than the sockets I used, but will do a very nice job with one slight modification.
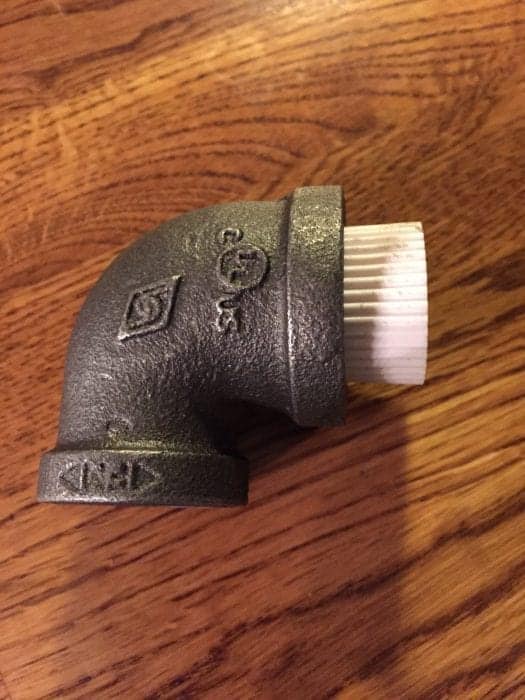
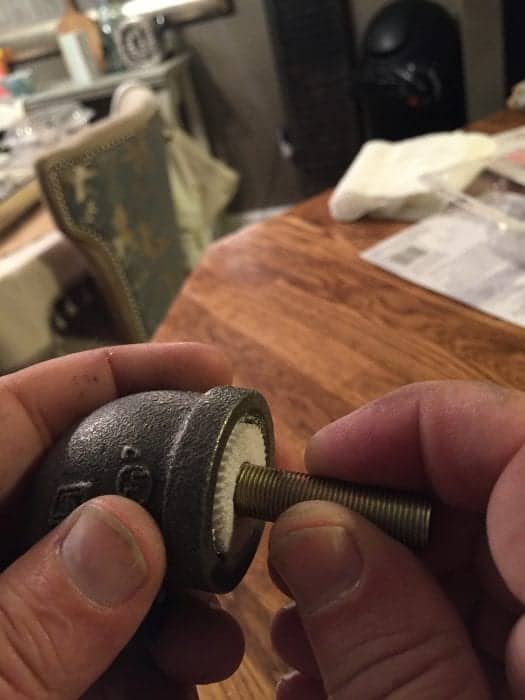
First take the 3/4″ bushing provided with the kit and screw it onto the 3/4″ end of the ell.
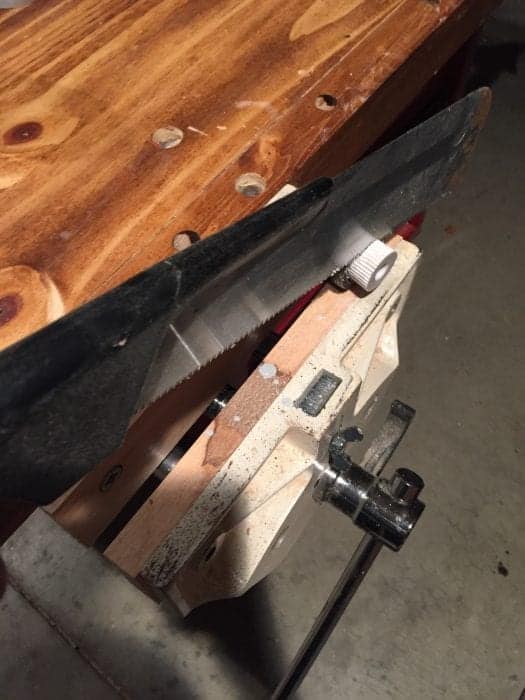
You will have some overhang because the bushing is too deep. I took this to the bench and cut it off flush.
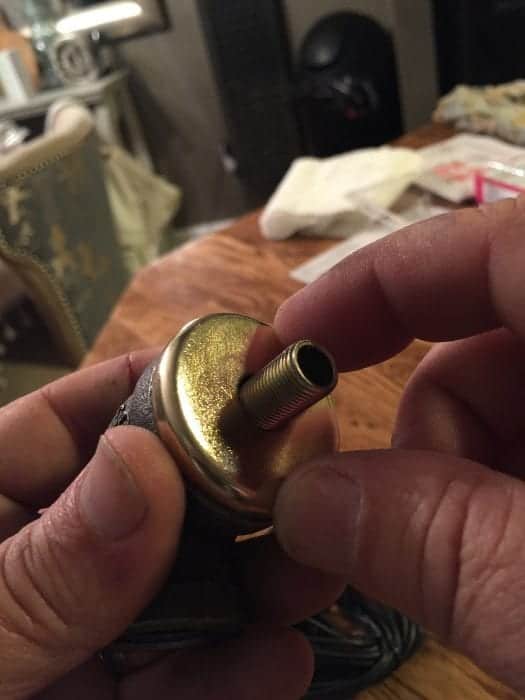
Now you have a flush bushing in the pipe. Take the threaded nipple provided with the kit and thread into the bushing until an inch or so remains sticking out.
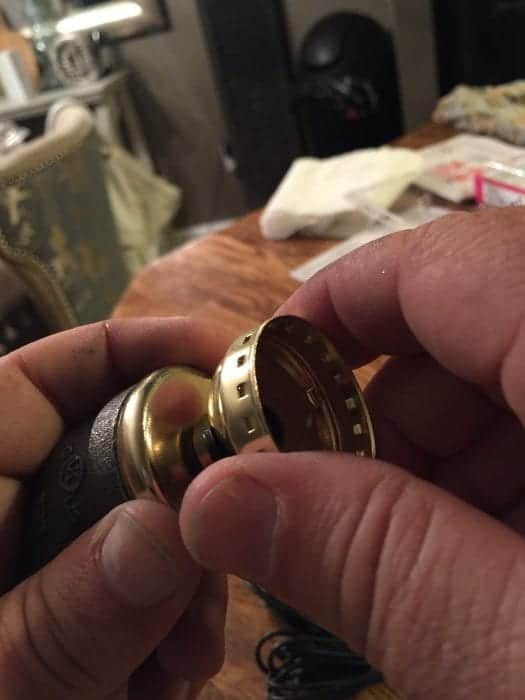
Next place the cover plate provided with the kit
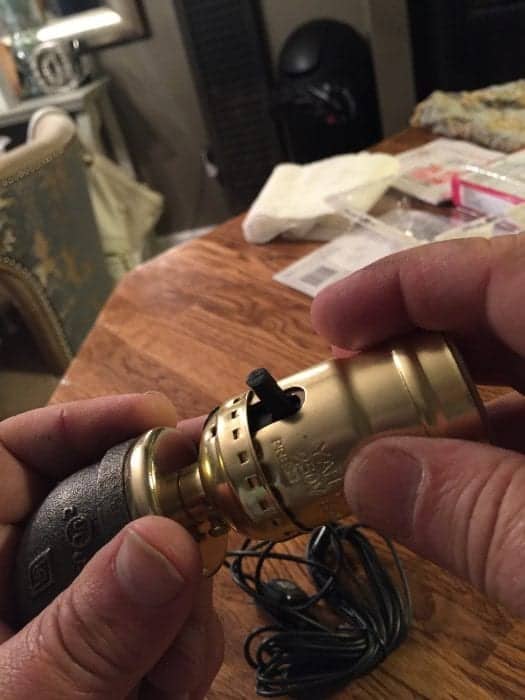
From here assemble the light socket as shown on the kit instructions. I should say here that each of these kits comes with a wire that has a plug on the end. You don’t want to use this wire but rather the wire specified in the materials list above.
Either way will work just fine. I still like the way we did it because it was meaningfully cheaper and I like the black socket on the light rather that the copper. but obviously you can go whichever way you choose.
Step 7:
Wiring up your fixture.
The above steps outline the procedures that we used, while the outdoor fixture does provide a better look than the lamp kit, it is not the simplest way to attach the lights to the fixture.
As we are not electricians we will not be providing detailed instructions on the wiring of the light fixture. In the original post we had made an attempt to do so since there was very little information available on the web as we were doing ours. After much thoughtful and valuable feedback from you we thought it best to stay away from the wiring discussion.
We recommend that you consult with an electrician familiar with your local codes and let him/her either do the wiring for you or guide you through the process.
Total cost $67.
Because we are working on a full bathroom makeover, this reveal will be forthcoming…so this is the only “after” picture we have at the moment.
As Jeanette says…be sure to follow along with the bathroom makeover which should wrap up in the next few weeks. More to come….and thanks so much for supporting us on our journey, and most especially for all of your kind words during my health crisis last year…I’m thankful for all of your support.
– Mark






Great light fixture and I am loving the industrial look. Great post Mark.
Thanks Vanessa. I am excited to come out of the shadows and contribute.
Stunning! You guys rocked this but then again I love all thing plumbing pipe can not wait to see the room reveal!
Thanks Dria…I’d love to borrow your plumbing pipe projects for this room. This was a fun project because my son got involved too. Blogging has become a family affair around here. :)
Thanks for this great tutorial. I can’t wait to show this to my husband to perhaps inspire him to do something similar for me.
Great job on your guest post, Mark! I hope you’ll share more projects in the future.
Thanks Paula. Plenty more in the hopper.
WOW! What a cool, one-of-a-kind fixture!! How fun that your hubby delivered the info on it too! Great job! XO
Thanks Christy, he did a great job….I’m hoping for a lot more projects like this around here ;-)
Oh my gosh I LOVE that fixture! I saw your picture on fb and had to see what you did because I have those builder grade fixtures in my bathroom too and need to do something. I love the bulbs, the wood, the industrial look of it and how it all came together. Very rich looking!
Thanks so much Cindy! We love all things industrial and we are slowly DIY’ing a lot of those style projects. I hope to accomplish more very similar projects like this one. Thanks for stopping by! :)
Mark, Of course you did a great job on the light fixture and you did an awesome job on the write up of the tutorial! Cant wait to see more projects!
WOW, I LOVE your new light fixtures!
Thanks Marilyn! I am so happy with it….we reduced the # of bulbs in the room and it’s still nice and bright. So excited to finally have a grown up-looking master bathroom. Thanks for stopping by!
Mark, you knocked this one out of the park!
LOVE, LOVE, LOVE it!
I was just looking for a new light fixture for our new basement bathroom. The theme … rustic / industrial / vintage / farmhouse. SCORE! Now my hubby has another project to add to his list! Thanks for the detailed instructions, too!
love this! It looks gorgeous!
WOW! Inspired!! Pinned it soooo fast. ;) Really, this is gorgeous and fantastic!
Super project! Can’t wait to see the big reveal! Loving your creative light fixture! I’m looking around my house trying to fins a way to add one..somewhere! Awesome job!!
Cool project! I love the stained wood with the metal. I’m looking forward to seeing the finished bathroom! Great post and easy instructions Mark! Want a fun project for both of you to work together on. ~Jeanette
I love this lighting option! It’s so unique! Thanks for sharing the idea!
Wow, this is a fabulous light fixture and you two make a great team! Thanks for the great tutorial!
This is so cool! I love it!
Love how this turned out! What a unique fixture! We’d be honored to have you share this at our weekly link party. Hope to see you there! http://www.thelifeofjenniferdawn.com/2015/01/a-little-bird-told-me-link-party-125.html
Wow this turned out great! I might have to try to do this in my bathroom love the look!
wow, this is amazing. i had that same before fixture, and was so happy to finally get rid of this.
b
Thank you! We are so happy with the Edison bulbs which give a warm glow to the room. Before it was looking at the sun with the ugly builders grade fixture :D I appreciate you stopping by…
Great light fixture! Thanks for sharing at Think & Make Thursday!
Leigh Anne – thank you for stopping by to comment! This room is still a work in progress, I can’t wait for the final reveal soon!
I love your industrial light fixture Jeanette & Mark! I like it better with the dark walnut stain. Great tutorial Mark! I’m going to feature it this weekend at the DIY Sunday Showcase Party. Thanks for sharing it with us :)
Thanks Marie for the feature and for taking the time to stop by and comment. I will become a regular at your parties for sure! Take care!
I’m so in love with the whole industrial look…but have yet to incorporate it into my home. But thanks to you, I’ve now got a great idea! It turned out awesome, thanks for sharing!
Amanda @ The Hatched Home
Amanda, we love industrial too but I’m in the same boat. We have accents of industrial upstairs (and I want more) but our basement is full fledged industrial. I love it but I’m always tempted to put something more Victorian and frilly in the space (but my husband says “no”). :) thanks for taking the time to comment.
I LOVE this light fixture! It’s amazing! I would love it if you’d come visit Skip The Housework link party and link them up! http://www.reasonstoskipthehousework.com/skip-housework-link-party-54/
Thanks so much Melanie – I am starting a link party this week as well! I will be sure to stop by yours…thanks so much for stopping by to comment. We love this fixture, it changed the entire room which was much needed.
This is AWESOME!!! I want :-)
Lala I’m a lucky gal to have a handyman here at the house. He’s happiest when he’s creating, too! Thanks for stopping by to say hello!
Mark (and Jeanette), can I just say this is AHHH Mazing and I am so impressed with the total transformation and very industrial look you gave your bathroom on such a small budget. My dad was so handy with tools and could make anything so to have a man that can do or help with these projects is fabulous. It looks so great! Thank you also for linking up to our Something to Talk About Link Party today. I will share this on Fb for sure. have a great week, Lisa
Thanks Lisa! I am glad we finally worked some industrial decor into this space. I was trying to achieve “his & hers) and maybe bring a few more Victorian touches into the space as well. I can’t wait for this project to wrap up and move onto other projects. :)
That is absolutely awesome! I hope you share the rest of the remodel with us at #FoodieFriDIY! Pinning and sharing this…maybe a little inspiration for us to get some of the projects around here done as well. :)
Thanks Michelle! Yes I’m still in the process of painting our vanity and I will be sure to link it up once the whole room is finished. I’m moving a little slower with my DIY these days (and maybe a little bit of a perfectionism going on here, too!) Thanks for your comment and for stopping by!
Jeanette – this industrial light fixture is fabulous! We especially love the dark walnut. This tutorial gives us encouragement that we might be able to make a light fixture for ourselves! Thanks so much for linking this project to Something To Talk About Link Party!
Totally love it! I am featuring this post on Worthwhile Wednesdays tonight.
~Allie http://www.craftyallieblog.com
Allie – thank you, that is awesome. I appreciate you stopping by and commenting. :)
Popping over from Worthwhile Wednesdays =) Congrats on your feature! I love the industrial look. Planning on my own bathroom redo in the future. I’ll have to consider this look now… Be sure to share your crafts & DIYs at Two Uses Tuesday (Mon 11pm EST to Fri 11pm EST) over at Sarah Celebrates if you don’t already!
Thank you! I appreciate you stopping by Sarah and so excited about the feature, too!
Looks fantastic! I just showed my husband and now we’re thinking about doing this in our downstairs bath. Pinning! Thanks for linking up to Show Me Saturday.
Hi,
I love this look! How does the light socket stay connected to the pipe?
On the industrial light fixture the light socket connects just like your standard sockets. We spray painted the connectors, but if you need additional help / answers I will have my husband answer for you since he’s the mastermind behind this project. ;-) Thanks for stopping by! ~ Jeanette
I’m building this fixture and am wondering if you used some sort of heat resistant epoxy to connect the sockets to the 3/4″ end of the elbow or if you are just using tension from the wires? Seems that tension would release over time causing the bulbs to sag.
Mark,
Sorry response was so slow.See below reply to Paul.
Just used the friction fit pulled the wires very tight.
Yes Mark that would be the case, wire will stretch over time. The sockets could be secured with any type of glue or even clear silicone. The wire could actually come loose after a while and short out on the inside of the pipe. The second method looks like the best choice to me. There would be no tension on the wire to the sockets. Please everyone be careful when making these fixture, while they are very nice the method in which they are put together can be an issue.
Hi guys
Nice job. How did you connect the light sockets to the threaded pipe?
thanks
Paul
Paul and Mark,
My apologies for the delay in responding. New to this blog thing and didn’t know questions were out here until Jeanette’s told me.
It is a challenge because no one has come up with a fixture that is threaded correctly. I took advantage of the snug fit and the used the tension of the wire to pull the fixture in tight.
The wires from the fixture themselves did not reach all of the way out of the pipe so used the wire nuts connect the stubs from the fixture the the main wires to hold it snug inside the pipe.
Make sense?
I was wondering the brand of outdoor light socket you used. I can’t find one that fits a 3/4 elbow. Thanks
I am having the same issue – no way is it going in that elbow :(
Problems:
1. Fixture will not work with a 3/4″ L
2. No such thing as black galvanized iron. They are either black iron or galvanized fittings.
3. Your fixture design does not work.
4. Spent over $100 with bulbs and are returning all material….waist of time
Jim Mechanical engineer
Why is Feb 1015 the last time you post comments? I posted one yesterday and now it is down. Tried to build the fixture and had problems with the light sockets not fitting into the ells. It seems others have had problems as well. This is a flaw in the design.
Jim,
Let me first say that I’m sorry that you spent $100 on a DIY that doesn’t work for you. We are editing the post to help clarify the parts list and exactly how we made this DIY work for us. We are not mechanical engineers, my husband and I also work full time in IT (we are both at work right now) and are part time DIYers. So I asked Mark, my husband, to clarify the design. I also replied to your email directly and my email did not make it to your inbox. Mark took pictures (separately, just for you and to show you exactly how he make this DIY work). It may not be perfect (because we are building our own light from spare parts) but it has and does work for us.
Let me first also apologize for any confusion caused by this post. It was my first attempt at a tutorial and have learned that I need to be much more specific about each step. People were very excited about how it came out so we decided to put a small post out there to help people build their own. Many times when you make things you don’t do them with the intent of sharing. We just needed a light fixture. When that happens, things that seem intuitive maybe are not.
I have updated the post to include detailed photos and descriptions of how I made it work with the inexpensive sockets from Home Depot. They do not fit inside of the pipe but sit flush when the wires are pulled tightly. It is not ideal but they do stay in place nicely. You can make it more stable by gluing the socket in with epoxy if you like. Also I have added instructions for using a lamp kit, which I was unaware of at the time of the post. This will provide a much sturdier connection for the socket but has a significantly higher cost associated with it and a different look.
As Jeanette mentioned we do this part time, and myself considerably less than that. It was our hope to share an idea that worked well for us, I am learning how to make those instructions more effective and also am now plugged in to be able to answer comments myself. Both of us are dedicating considerably more time to the blog now and I am building things with an eye toward providing instruction. In the interest of being more precise, I could not find anywhere in the post where we referred to Galvanized Iron, if that caused confusion I am sorry as well but I can’t identify where we made mention of that.
Cheers,
Mark
What do you do with the ground wire ? Is it needed?
Hi. I’m super excited about trying this project but I found that this link:◾Four Hex Screws 4″ long – also silver, will paint later – doesn’t work. And Home Depot no longer carries the white/black wiring (◾10 ft each of black and white #14 wire and 20 wire nuts that will fit up to 3 #14 wires). What can I use in its place?
Thanks,
Sheila
Sheila,
It’s ok if you cannot find the black and white wires. The key is that you use ar least #14 wire. The point here is that they are two different colors so you can tell which to connect to the different color wires in your wall. Most are black and white coming out of the wall. But the color really doesn’t matter. One color ( usually black) is what they call the hot side, the other color ( usually white) is the neutral. As long as you choose colors that allow you to distinguish which of your lighting wires match up with which of these wires you will be ok.
I will check the link. But if you ask for four inch galvanized hex head screws at the hardware store they will know how to help you.
Hope this helps,
Mark
So I was pretty excited about this until I went to build it. I got the first one almost done then decided to bail for safety reasons. I understand from your comments this is just a helpful post showing what you did and not a detailed blueprint, but there we several problems I see with the design that could cause someone to get killed.
First, and most importantly you make no mention of grounding. You have a metal fixture with AV current running inside of them. A bad wire connection or a cut on a wire (both of which are fairly likely.. See below) and you have created an electrocution hazard for anyone touching the fixture.
Second, the wires from the black outdoor light kit aren’t long enough to reach far enough through the pipe to be able to easily make up you wire connections with wire nuts. You mentioned something about it being in the pipe in One of your comments, but I don’t really understand that as there isnt enough room. If you manage to make the connection it’s going to be dangerously close to the pipe and like I said above, no grounding.
Third if you are running wiring through metal like this you should use some kind of plastic bushing where it crosses edges to prevent fraying on the sharp edges of the pipe.
Fourth, any of the above hazards are only made more likely by not attaching the fixture to the elbow. I see you recommended this but also said you didn’t do it, just counted on tension. That same tension is pulling on each end of the wire connection you made, and eventually someone is going to replace a bulb or wear and tear over time is going to pull loose a wire and there is no grounding.
I don’t say these things to attack you. I’m not an electrician and one could very well follow up my post and tell me I’m crazy, but as a diy person myself, I think we must always think about our own safety, the safety of others in the house, and the safety of those who might be in the house after you, having no idea the light fixture is a safety hazard.
I love the look of the light, but without a more solid design from an electrician who knows the electrical codes, I think most people should stick to purchasing a light that was designed to be safe.
RW,
Thank you for the feedback. Your points are well thought out and helpful. My description of the wiring was not as thorough as it might have been, and after receiving feedback from you and others I have decided to remove any reference to the wiring in the post and steer readers to an electrician familiar with local codes. I would hate to see you bail, the wiring is pretty straightforward and hopefully a local electrician can knock it out for you.
This was my first post and I think I got a little over helpful because materials were so difficult to find to assist me. I had done a fair amount of wiring in the past and thought that describing the wiring would be helpful. In actuality though, discretion is the better part of valor when it comes to things like wiring. There is good reason that other bloggers shy away from this discussion.
The fixture plans are sound and easy to build but I agree that any wiring effort should be left to local experts.
It is our mission to provide fun, safe and interesting DIY projects for our readers. Your feedback helps make sure that we achieve that mission.
Thanks Again,
Mark
The light fixture is very nice, the only suggestion I would have is the version with the indoor/outdoor sockets should not be held in by tension. As a previous member of the IBEW for over 10 years I can tell you that this will put unnecessary strain on the wire. Wire will stretch over time and the socket will be come loose. Also to wire could be pulled out of the socket which could touch the inside of the pipe. My recommendation would be to silicone them in place with clear silicone to avoid the strain on the wire. There are some other options that would work also. I would be happy to email with any one that has any questions about the method I am talking about.
Thanks very much for the post. A bit annoying we can’t get the handy parts that are in the US.
Seamus
Ireland
Hi! I just bought the parts for this project. The price has went up a little since this post :). What light bulbs and specs did you buy? I want bright lighting for my bathroom, but think the edison bulbs will be too warm. Please let me know your thoughts.
Good evening! I have a couple questions for you! Did you spray paint the pipe that you used? It looks a little darker than what I was able to find. Secondly, What wattage/lumens of lightt bulbs did you end up using in your bathroom? Any other tips you have we would love to hear! Please feel free to email me. Thank you for sharing your beautiful design!