
DIY Wainscoting Step-By-Step Guide!

Wainscoting is my favorite architectural element in a home. Whether you are building a new home or in the market to buy an existing one, don’t discount wainscoting as an impossible, difficult or too-expensive option. On the contrary…it’s one of the most inexpensive and easiest DIY upgrades you can tackle. (We know this now after upgrading our entire builders grade home!)
DIY Wainscoting Tutorial
Does wainscoting add value? // A similar trim package through our builder would have cost well over $30K. By installing wainscoting ourselves it saved us money while significantly increasing the value of our home. We listed our house at a price well above local listings because of our finishing touches, and a bidding war ensued with an offer $10K above our asking price! (See our whole-home transformation here).
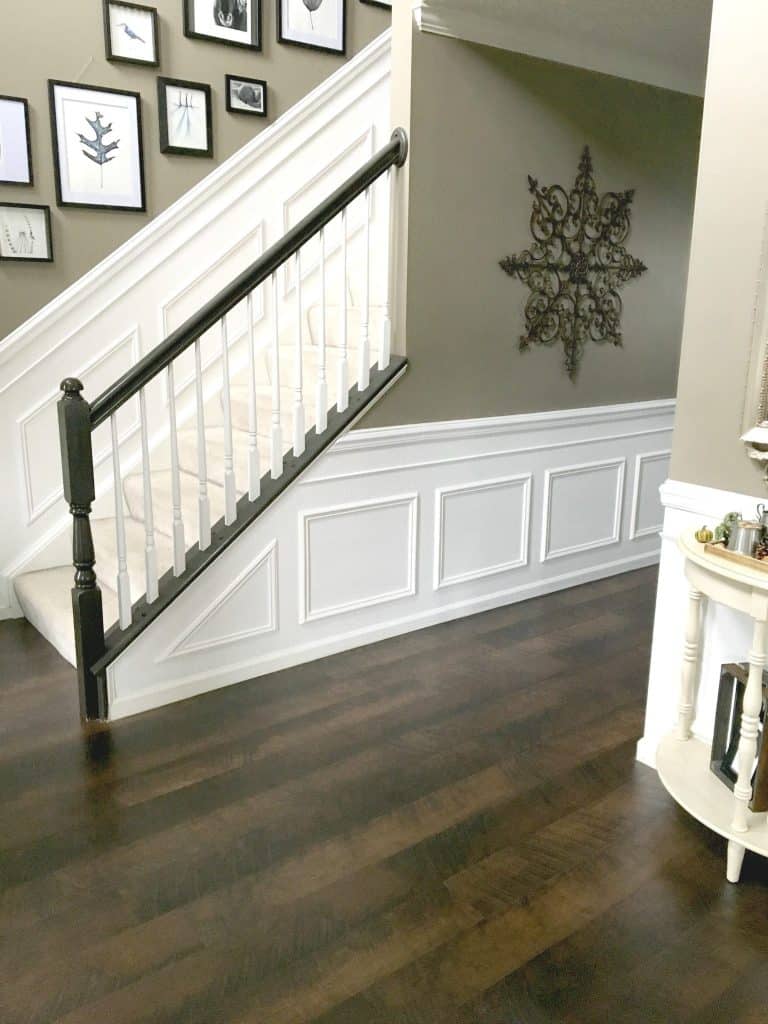
For this initial project we added wainscoting to the right and left walls in our foyer. Although our home is open concept, the connecting foyer has 8′ ceilings.
Wainscoting Placement: How High?
Wainscoting should generally be 1/3 of the overall wall height. On our 8′ foyer walls this means our wainscoting should be 32″ at it’s highest point. However, in the context of our open concept house this seemed to short – so we raised ours to 36″. Keep in mind that we kept our 3 1/4″ builders-grade baseboards which came standard with the house. Eyeing up proportions is key.
Here is another great post discussing the height of wainscoting.
Wainscot Techniques & Profiles
Before you install wainscoting it’s important to choose a profile that complements your home’s architecture. There are many varieties of wainscoting to choose from, (an entire library can be found here). Our Colonial-style home called for a more classical colonial profile. Tip! Turn your trim sideways when you’re in the lumber aisle to ensure you’re keeping with a similar profile for all trimwork. This will keep your aesthetic complementary to the rest of the wall.
Some of Our Trim Pieces Are Upside Down
On top of the chair rail is an upside down, tiny piece of trim. It just felt more finished with that extra embellishment on top. There was no exact science to how we did our project. We did a lot of “eyeing up” the trim, experimenting with different layers until we ended up with the classic wainscoting look that we wanted.
Wainscoting Cost for the Hallway
- Total Cost: Depends on your space, but our initial 2 foyer walls cost under $500.
- Time Involved: One weekend (with the right tools and a good tutorial)
Click the Pink + to purchase and reserve your trim!

(affiliate links included throughout this post to make this project simpler for you)

- Chop saw and you’ll need to learn to cut 45″ angles
- A level
- Finishing nails
- Nail gun
- A pencil to draw lines on the wall
- Caulk with wet cloth to wipe excess
- Primer
- Paint of your choice. We went to Home Depot and purchased Behr Semi Gloss White Interior Paint.
Wainscoting Steps & Tips:
Once you master how to cut 45 degree angles using a mitre saw remembering which angle to cut then you’re set. Any gaps, you simply fill in with caulk and smooth it with a wet cloth. It immediately closed all the gaps and made the wainscoting look like it was part of the house for years.
1) Decide how high the top of your chair rail should be, draw a line across your wall using a level 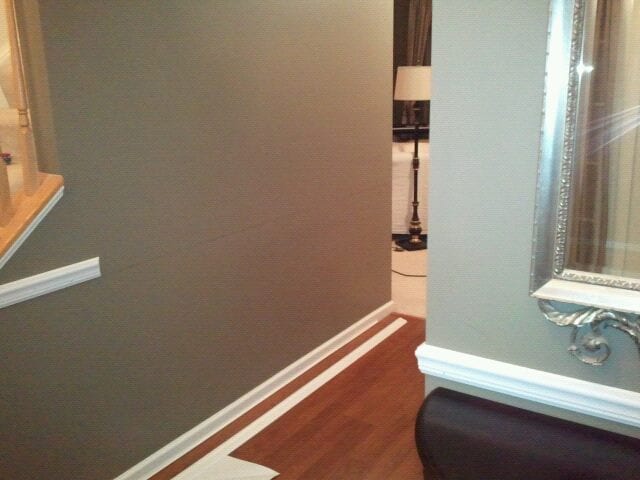
2) Apply chair rail with glue. Once set, secure with finishing nails. 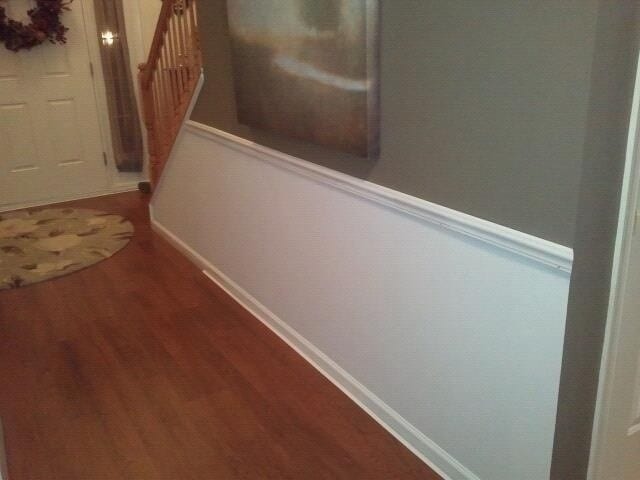
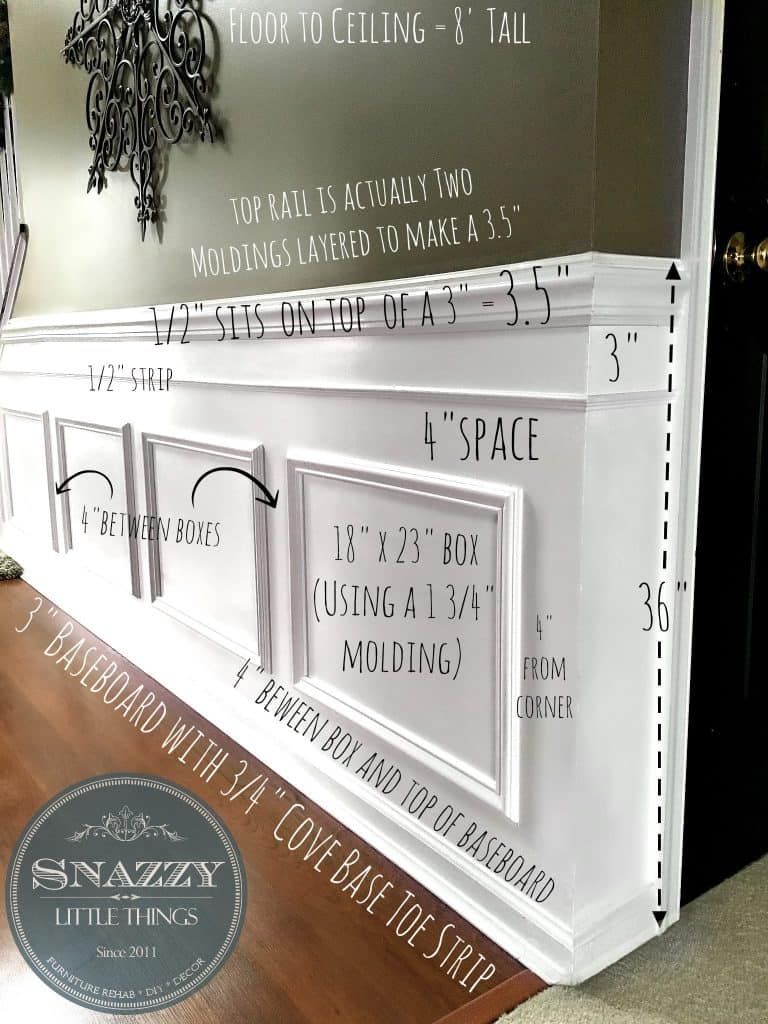
3) I primed the wall next to get a feel for the space. Then measured the wall using my detailed image in step 4. –> 4) Map out trim using this image, apply all trim following the same steps in 1-3. 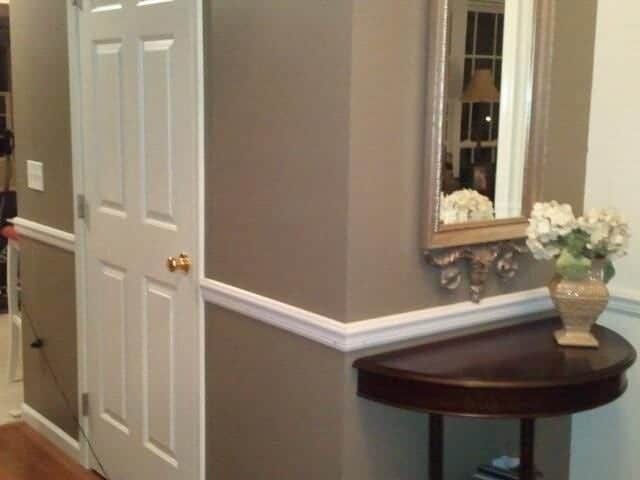
Step 1, repeated 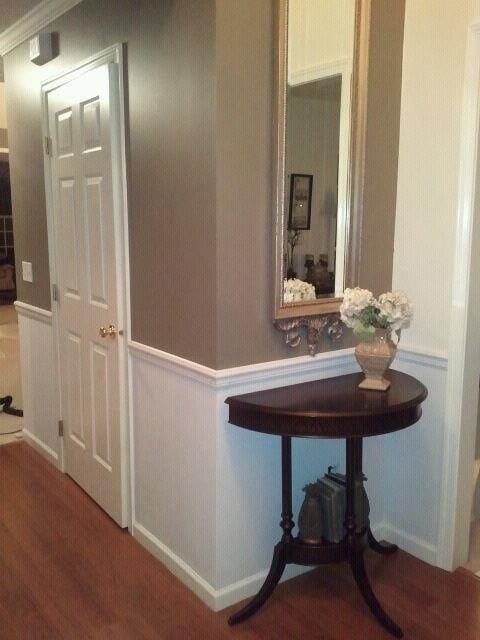
Step 2 repeated. 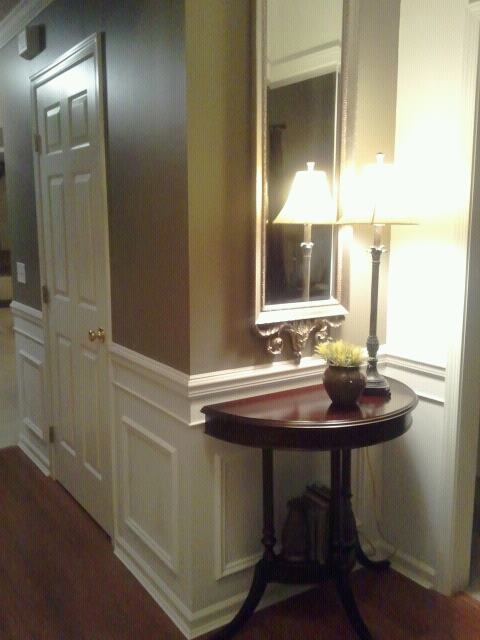
Once all the trim is up, fill nail holes and gaps, then finish with trim paint.
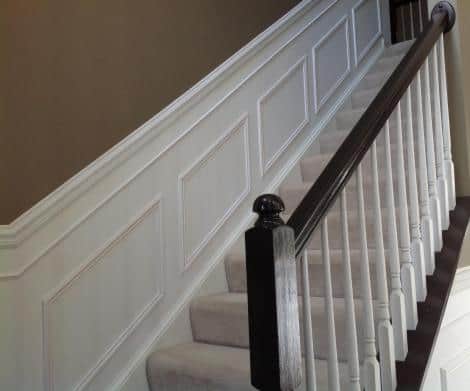
Eventually we added more wainscoting up the stairs but we saved that for another day.
Apply the chair rail first! // We find it helps you visualize the rest of placement. Two hand are needed to get the longer pieces secured. We glued them first, then attached using finishing nails and a nail gun (and be sure to hit a stud). In our case, our studs were randomly placed which caused our walls to be wavy (cheap builder!) I would highly recommend using a stud finder to avoid placing multiple holes in your walls.
I filled the nicks in the wall with a nail filler and a scraper. Then I sanded and primed.
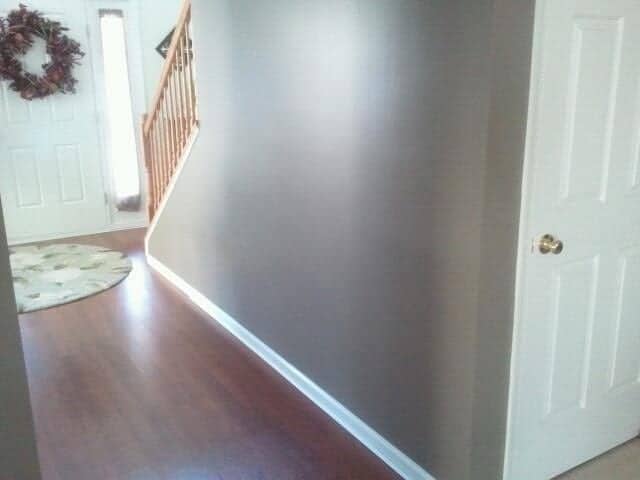
Eventually we continued installing wainscot up the stairs, and around the corner where the basement door is (on the right). Note the front door is still white in this picture, and the oak railing painting project hadn’t taken place (yet).

Caulking Tip:
My trick for caulking? I use a bathroom caulk since it expands/contracts more effectively with the varying humidity inside of my home. You simply lay a bead of caulk along the gaps and corners, then use a wet cloth to push the caulk down into the gaps and create a finished seam. Then use the same rag to clean up the excess. It fills the gaps and trims out the piece beautifully.
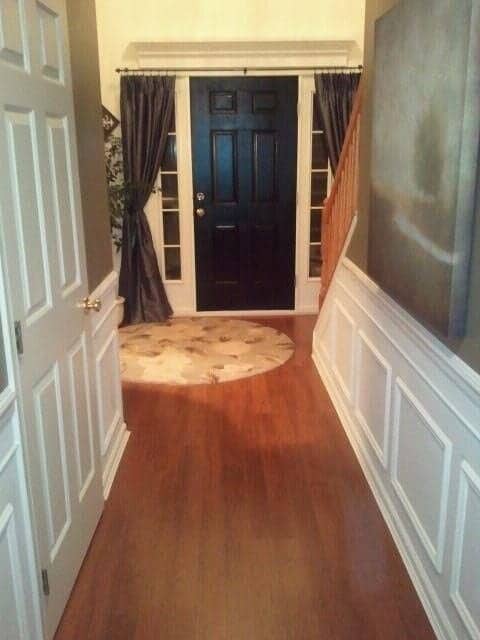
This convinced me that I wanted the rest of the interior doors black. What do you think?
We continued installing wainscot up the stairway and loved the results. What a difference! We couldn’t stop staring at the results after the first weekend we did it!!
See all of our foyer & entryway projects:
- Our foyer paint color
- Painted stair railing
- Frieze molding we added at the ceiling
- We learned how to make our own trim
- Painted interior doors black
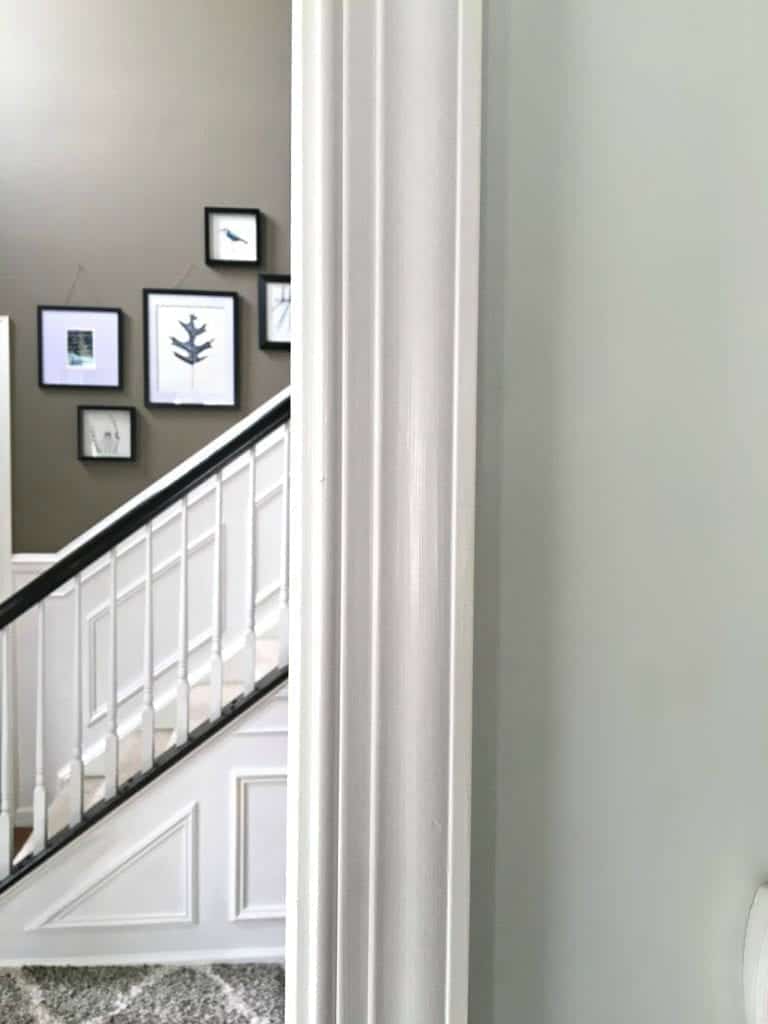
- Gallery wall up the stairs
- Pergo flooring upgrade (whole home)
Some ask, “don’t you think wainscoting will go out of style??” My answer? And emphatic “NO!!”
I have lived in many old brownstone apartments which were built turn of the century with not only classing wainscoting but also built-in cabinetry, arched doorways, leaded glass cabinets, old radiator steam heat. I would say this architectural style is quite possibly is here to stay.
PIN IT!
SHARE YOUR PROJECT PHOTOS!
If you’re one of many people that tried out our tutorial, I’d love to see YOUR results. Post your images below and let us know if we can make any improvements to our tutorial. Good luck!


Great job, Jeanette! I love wainscoting and you did a FAB job.
Thanks Denyse, we love it. Major upgrade, but at a very low price.
Can you give me the name of your paint and brand? Is it grayish or brownish! So pretty!!
Thanks Kristin! Here is the paint information for you: https://www.snazzylittlethings.com/paint-colors-in-living-area/
This adds such a great value to a home! You did such a wonderful job, thank you for sharing!
Thank you Angie!
I’m a big fan of wainscoting! I want to add it to my hallway…at the very least. Once I start envisioning it in one spot, I can picture it in just about every room in our home. Thanks for the inspiration!
I’m the same way, Sharon. There is always room for wainscoting in my opinion. :) thanks for stopping by.
What a difference your handiwork made in the foyer, Jeanette! It added so much more interest and value. I don’t do power tools! LOL So I truly applaud the fact that you were able to do this. :-)
Thanks so much Sue for stopping by. I am not as brave as some DIY’ers, but I’ve come a long way using power tools. They are less scary than my sewing machine, I’m still working on overcoming that fear :)
Hi:
I just came upon your work and was very impressed. I have been looking at some Wainscotting projects on the web and yours is extremely interesting and inspiring. One question: Did you nail the pieces to the wall using a staple gun or you actually nailed everything by hand into studs? I’d be interested to find out how you did that.
Thank you,
Michael
Michael, just making sure you received my reply in email. Thanks so much for your comment :) have a good weekend!
Wow! What a difference! Nicely done & thanks for the Tutorial link
Thanks so much…and yes, I didn’t invent this tutorial but I certainly had to reference it. It was one of the best out there. Thanks for stopping by!
This is something I haven’t tried, but you’ve inspired me. I too think that my foyer is crying out for some architectural detail.
Kimm, great news…our foyer was so “plain” and when it was builders’ white, fingerprints galore! I don’t fill my walls with a lot of pictures, and with this detail, I don’t really need to. Thanks for stopping by :)
How many inches did u go up from the floor???
36″
Your wainscoting looks awesome! I’ve been wanting to do that since the day we moved into this house (ten years ago) and just never seem to have the time. You’re inspiring me to just do it (like Nike says:)
Thanks Pam! It changed everything in our house. It definitely took our entire weekend but we were so
relieved it was overhappy with the results!Hi what color is the paint? Great job!
Thank you! I bought this paint years ago and now have to ask for it with specific paint number information: (The name was Moonlight Beach at the time but they no longer carry it by name).
Lowes #0633 330-695-935 Tinter B
3/7/12 Valspar, Gallon Size, SR214, Moonlight Beach, Signature, Interior Satin Base 4
101-2Y, 107-2Y10, 109-14, 113-7Y28
Hi Jeannette,
Loved what you did with your foyer, the wainscoting looks amazing. What are the measurements starting from the bottom of the wall to the bottom of the frame? the measurement from the top of the frame to the next trim? The measurement from the middle trim to the top trim? And lastly, what’s the measurement in between each frame?
Thanks so much,
Eddie V
I am doing the same thing in my entry way and up the stairs. I found this on pinterest and checked it out because it is literally what i am in the process of trying to do. But i am wondering what you measured the squares out to be? even the small triangular one at the small part of your stairs. Not sure how to go about figuring that part out. please help!!!! :) BTW- IT LOOKS AMAZING! i cannot wait to finish mine!!!!!
Hi Candace, I just wanted to let you know that I got your message and I’ll get back to you asap!
I have been wanting to do this for the longest time. Time and a toddler are the only reasons I haven’t yet. Thanks for the inspiration!
What color did you use for your wall? I really like it!
Hello! Can you please give dimensions on the height of your wainscoting, as well as the square size, distance between each square, and your ceiling height? This is EXACTLY what I want and I pretty much want to do it just like you have! Great job! :)
Hi Courtney, thanks for stopping by! Your questions inspired me to update the post with a photo that might help you quite a bit. Ask for “Colonial” style trim or molding when you go shopping. That’s what we used for ours. I’ll email you as well. Good luck! :)
It looks awesome and I’m considering it for our main floor. One question off the topic above though, where did you get the metal wall hanging in the picture?
Hi Lauren, I also replied via email to you, but just wanted to reply to your question here – my husband bought that at Kroger (a grocery store of all things :)) Thanks for stopping by and taking the time to comment!
Fantastic Job on this Jeanette! Our builder’s grade entryways are almost identical and the Hub and I have been tackling this project while being stuck inside during this east coast snowmagedon. Your post has been truly helpful and inspiring. One question…can you provide any detail (measurements, cut angles, miter technique, etc.) about the leading triangle piece near the stairs? Thanks in advance.
Hi Tameka,
Thanks so much, I can’t believe this project was four years ago already! To answer your question, I believe we had that cut wrong several times. I would recommend a laser level and use that and line it up with the angle of your stairs, then create a line across your trim piece. I do remember us having to take it down and start over with a new piece (our chair rail is actually 2 pieces spliced together on that wall). I hope this helps and good luck!
Hello! I have been wanting to do wainscoting in my dining room for some time to make it look brighter and more elegant. After finding your post on Pinterest, I was impressed with your DIY work. The foyer looks amazing! Thank you for sharing the information and measurements, posting a tutorial for us to refer to and explaining that it can be inexpensive and an easy upgrade if you attempt it yourself! This busy, mom with three kids is gonna give it a try, thanks to your inspiration!
Jodi Kietzman
Looks great! I love wainscotting too!
Katie
Button-jar.com/blog
Where did you get the 3″ molding and what is it called if you remember? We have tried to find it and so far have failed.
Hi we are still having a hard time finding anything similar to these moldings…you don”t happen to be able to send us a picture of the individual moldings you used? We have searched far and wide and this is exactly what we have been wanting to put into our house as we are restoring it to its original victorian state.
Hi! We love your project! We are adding wainscoting to our living/dining room and wanted to do the same thing you did in our foyer/entryway, but we are nervous our hallway is too narrow and it would feel more confined. Do you mind measuring the width of your hallway and letting me know the distance? Our hallway is 37″ wide from wall to wall. Do you think that’s too narrow? Thank you so much for your time.
What color is on your walls with the wainscoting?
Hi Jeanette, I didn’t see this and emailed you a few min ago, but want to send here in case this is a better way to ask you a question. Can you tell me what finish you used for your background paint and for your paint on your frames? We aren’t sure if it is supposed to be the same as the current chair rail and trim (ours is gloss)? I am just really confused at what finish paint to use.
Kristina, let me know if my email answered your questions. I do believe your chair rail should be painted in the same sheen / color as the rest of your wall. Let me know how your project is progressing!
Hi, your project looks great! I was wondering if you know what color is on the wall above the wainscoting? I love it!
how would you handle the wainscoting if a window is in the mix…
I really like this treatment Frank. http://www.mitrecontracting.com/images/2008/06/02/6577.jpg
This is very nice! I love your work! I’m also looking into doing this to dining room and eventually ny foyer and going up the stairs.. how do you work around return vents, outlets and regular vents on the wall?
Could you possibly send a close up picture of the way you put the top two moldings together?
I also bought all the molding exactly as described here and would love a closeup of all the trim pieces so I know which directions I should be placing everything! Thank you for such a wonderful tutorial!
Where did you find the lumbar for your project? I’ve checked Menard’s and Home Depot and neither one carry the same chair rail, strip, nor wood for the rectangles. Do you remember which SKU’s you used for the Wainscoting project? And where you purchased your lumbar?
Loved your end result. Exactly what I am looking for. Looks like this has been some years ago, but very interested in this style for my house. I couldn’t find the trim that you used. Can you remember what is was. I am looking at lowes. I have the dimensions and such but I need advice about the actual trim and molding to buy. I already have a chair rail and baseboards where i am adding the wainscotting. Thanks Heather
Hi Heather! This style of wainscoting has been popular for several decades, so you’re making a good style choice in my opinion. In the post above, there is an image that you can hover your mouse over and it will reveal a little (+) signs Once you do it will point you to the exact size trim we used for each section. I hope this helps!
Looks fantastic. Do you know the dimensions of the boxes up the stairs?
Hi,
Your work looks remarkable!
Would I be able to use an 18 guage Brad nailer instead of a 16 guage finish nailer for this project?
Thanks in advance.
Wes
Thanks Wes! My husband said the 18 gauge can be used, and suggests 2″ nails. Anything shorter won’t be long enough. Good luck!
My husband and I used your tutorial and couldn’t be more thankful for it! We have done everything except combine the top two pieces of mouldings (chair rail plus thin strip). Can you tell us how you spliced these together? We are not sure which way it should be positioned. Thanks!
I’m so glad you found it helpful! The top small piece of molding is upside down sitting above the chair rail. We kept moving it around until it looked the way we wanted it. It’s simply glued to the wall above the chair rail.
Greetings from Madrid Jeanette!
Your work is amazing. I’ve just got to have a go. A great tutorial.
Thank you so much Madeline! My husband was just visiting Madrid for his work. So glad you found our blog and I hope you find a lot of inspiration here.
I may have missed this question but, what SHEEN did you paint the wainscoting? I did this project a few years ago in another house (when I was a newbie) a few years ago and remember it was a different sheen and I had to sand the texture off the wall first.. This new house is in Northern Ky and they don’t texture walls here. just curious if you used a difference sheen for the project other then the sheen on the current paint.
I used the standard trim paint that you get from Lowe’s or Home Depot. But in the photos some of them are just primed (no sheen) and the final result was a satin.
Hi,
I really like what you made and am planning to DIY recently. However, I am not sure about the mouldings what size I should use. Would you please refresh your material link informations on the picture because there is one link not available.
Thank you and have a wonderful day!
Wendy
wainscoting has been around since Roman times. Architure was very important back them. I just read a very good article on the subject.
.https://www.thisiscarpentry.com/2010/12/03/misused-confused-chair-rail/ We’ve changed it a bit and added our own flair to it, but it is around to stay.
Hi Jeanette,
Wow! what a wonderful blog and website. I love the wainscoting. It truly does not go out of style. Here we are years later marveling at it. Great job!
One question: when I pinned this, there was a pict with links to all the materials you used. Now that i am ready to execute, I cannot find it. Was it removed?
Thanks,
Sue
Hi Sue, thank you! I put the image back up for you. I just removed it this week because it was slowing my website down and some of the links are expired, but it does give you a good visual. Good luck with your project!
What an amazing tutorial!
Fantastic job! The woodwork makes a huge difference! I always love the classic look of wainscoting.
This is gorgeous!! Curious what size nails you used for your nail gun? I have a brad nail gun that can accommodate 18 gauge nails 5/8″ to 2″ in length. I question whether that is strong enough to hold up the chair moulding (and crown moulding).
I think I may have failed to mention that we also use a wood glue to attach the rail to the wall along with finishing nails. The SKUs keep changing at the stores and I need to refresh the page every few months. I’ll try to do that soon!
Hey, thanks for tha tutorial, Ended up doing this project yesterday.
But i can not seem to find the 1/2 inch trim for the strip above the boxes anywhere.
Can you tell me where you got yours?
Thanks!
Great tutorial, i just almost completed this project but i can’t find that 1/2 inch trimp to go above the boxes anywhere,
Could you link where you got the 1/2 inch skiny trim from?
I think the hardware stores change the SKUs for the trim fairly often which makes it hard for me to keep up with on this post, lol! Sometimes it pays to go in to a Lowe’s or Home Depot with a photo on this page and sort through the trim aisle. The profile of the trim is very classic and simple. You can choose any trim you like, too. I’m so glad you found the article helpful. I’m always updating it with new skus and it makes me crazy, lol!
I love this!! Do you happen to remember the style of the molding you used? I am trying to recreate this exact design in my staircase
Hi, I love this tutorial as I’m going to attempt this on my stairs. I was curious if you made the skirt on the stairs or if it was already there. This seems like the trickiest part of having to cut for each stair. Thanks!
Thanks Brendin! The stair trim was already there, we only enhanced it by adding the trim pieces. I believe this was THE reason we were able to sell our house so quickly because this really impacted our design aesthetic for very little money.
Good luck with your project! :)
I love what you did! We are trying to replicate it! Some of your links do not work, I am a first timer at any home improvement projects- can you please tell using detail what moldings you used ? Size and name? I’m looking at HD right now and few totally overwhelmed lol! Thanks so much!!
Deirdre, you will LOVE the results. I’m updating the post now with new links to products that will help you duplicate our same method. Thank you I will email you once it’s updated!
Jeanette, this is incredibly beautiful! You did an amazing job! Can you please explain how to do the measurements and angles going up the stairs? I’ve been contemplating a similar project, but keep getting hung up trying to plan out the stairs. I’ve recently given myself a crash course in miter cuts and moulding, and I’m slowly collecting the proper tools, but math has never been my strong suit. Any tips or tutorials on how to measure wainscoting angles up the stairs would be most appreciated!!
Awesome! And thank you! We owe readers a crash course on how to measure up the stairs, I see you’re a subscriber (welcome!) so once we have that done I will email it out. We are making mini tutorials on TikTok (@snazzylittlethings) and I’ll tell my husband we need to model this for readers so we can show you how we did it (this project is from our previous house so we can’t show you the exact wall in the picture).
Keep in mind we did the hallway first with a lot of unfinished corner cuts until we mustered up the knowledge on doing the stairs. Minor mistakes on your cuts can be filled with caulk and spackle which saved our project. Making a template using a scrap piece of trim or wood is one quick way to get your stair mitre cuts figured out. You can mark the chair railing height (pencil) on the wall at the bottom / middle / top of stairs. Use a scrap piece of trim with a laser level and mark your scrap and use this to cut your stair pieces. I’ll also admit the math can be hard so we are big into making templates. Plus our walls were very wavy (and we did this in 2012 so some of our measurements now are from memory since we sold this house).
I need to show up for readers in a more personal way (video, lives) so I’ll be figuring out a plan to do this soon!
Hi! We are currently working on this project and trying to figure out what look we want for the top. Can you tell me what size / type of trim you added to the chair rail? Thank you so much!
Did you start in the center of the room for the boxes or from one side?
Thanks
Paige
Hi Paige, I also replied to you via email but just in case — we started at the outside corner and measured back towards the stairs.
Hello! I really like this idea, it sounds like fun! I was wondering if the measurements are the same for the sideway design going up the stairs and the only difference is that the boxes are sideways?
We are making winscoating ourselves and are currently working in the dining room, and will next go up the stairs. Our stairs are partially enclosed halfway up just as these are. Can you tell me if you added wainscoting to the wall on the same side as the hand rolling? Do you have a picture of how you did that?? Thank you
Looks great! the panel moulding you’ve used is it 1 3/4 or 1 1/4? the link takes you to the latter sized moulding.
can you please send me the two materials used for the top layer/ chair rail. I’ve looked everywhere and trout all of your comments, but can’t seem to find the right combination. I love how it looks and it is so much better than single standard chair rail moulding. would loveee your help.
Thanks
^ ok I found your original blog post with the chair rail pieces used and all of the equipment, except I don’t see a link to the 1 3/4 moulding used for the frames. could you help me with that.
How did you measure the cuts for wainscoting on the stairs? I understand how to do it on the level surfaces, its the stairs that is perplexing to me.